Tables
The Echo Table component is used for the display of column/row formatted data. It is very much different from the previously introduced Grid component, most notably because a Table visualizes data held in an external model. Table is one of the most robust of the built-in components provided by the Echo framework. A side-effect of its robustness is that it has a steeper learning curve than most of the previously introduced components.
Table Models
The Table component itself simply provides a view of data. The data is represented by an object which implements the TableModel model interface. TableModel specifies methods which must be implemented to determine the number of columns and rows in the table, as well as to retrieve the values of particular cells. The Table component will query the model for this data and then render it into an appropriate visual representation.
Abstract and Default Model Implementations
AbstractTableModel provides an abstract implementation of TableModel. It includes simple default versions of most of the required methods, so as to reduce the number of methods that must be implemented by the developer. AbstractTableModels also handle the addition and removal of TableModelListeners, and provide an array of convenience methods through which the listeners can be notified of events. The only methods that this abstract implementation does not provide are those that return the dimensions of the table (getRowCount() and getColumnCount()), as well as the getValueAt() method which returns the value of a specific table cell.
The DefaultTableModel class is derived from AbstractTableModel, and provides a full implementation based on ArrayLists. DefaultTableModel features the ability to insert and remove rows, and also provides a constructor that accepts a two-dimensional array containing the model data. More often than not however, you will probably find that it is more efficient to create your own TableModel implementation based off AbstractTableModel than it is to use a DefaultTableModel.
An Example
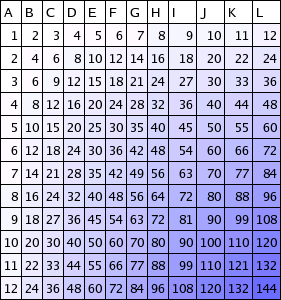
An example implementation of a TableModel is displayed in Figure 1. This TableModel describes a 12x12 multiplication table. It is based on the AbstractTableModel implementation, and as such, only three methods are left to be implemented by the developer. Its dimensions are defined by the getRowCount() and getColumnCount() methods. The getValueAt() method simply multiplies the requested column value by the requested row value to return the appropriate product for the specified coordinate in the multiplication table.
class MultiplicationTableModel
extends AbstractTableModel {

    public Object getValueAt(int column, int row) {
        return new Integer((column + 1) * (row + 1));
    }

    public int getColumnCount() {
        return 12;
    }

    public int getRowCount() {
        return 12;
    }
}
Figure 1: Source code for a table model used to produce a 12x12 multiplication table.
Table Cell Renderers
A TableModel returns the data of each cell as a Java Object. These objects are "run through" a TableCellRenderer, which is responsible for creating Echo Component representations of the Object values returned by the model. These Components are then displayed within the rendered table cells.
The TableCellRenderer Interface
The TableCellRenderer interface contains only a single method, getTableCellRendererComponent(). It is the responsibility of this method to return an Echo Component representation of the cell passed to it. It must return a unique component for every invocation. The method is provided with the value of the cell (as returned by the TableModel), the Table itself, and the column/row coordinate of the cell to be rendered.
An example
class ValueColorRenderer
implements TableCellRenderer {

    public Component getTableCellRendererComponent(Table table,
            Object value, int column, int row) {
        Label label = new Label(value.toString());
        int colorValue = 255 - ((Integer) value).intValue();
        label.setHorizontalAlignment(EchoConstants.RIGHT);
        label.setBackground(
                new Color(colorValue, colorValue, 255));
        return label;
    }
}
Figure 2: Source code for a table cell rendererer that creates cells with background colors based on the numeric value displayed within them.
Putting It All Together
So far we've discussed and demonstrated the use of TabelModel and TableCellRenderer. It's time to put it all together and show off a finished Table based on the previous snippets of example code. As you can see in Figure 3, final assembly of the Table is done with just a few lines of code.
TableModel model = new MultiplicationTableModel();
Table table = new Table(model);
table.setDefaultRenderer(Object.class,
        new ValueColorRenderer());
Figure 3: Creating the Table.
The net result of all this code is a 12x12 multiplication table. The background colors of smaller numbers are white, and larger numbers appear in blue:

Figure 4: The finished product.
