Grids, Panes, and Layout
Echo provides a number of components that enable precise control over the layout of a user interface. The following table provides an overview of the available layout components and their functionality.
| Echo Concept | Use | HTML Analog | Swing Analog |
|---|---|---|---|
| Struts | Provide space between two components, either horizontally or vertically. | Transparent spacing images ("blank.gif") | Struts |
| Panels | Panels are generic component containers. They can be used to provide margins, set justification and provide global colors and font properties for their contained components. | Grouping Elements (<DIV> and <SPAN>) | JPanel |
| Panes | Panes allow a window to be separated into multiple areas. Each area can scroll its content independently of the others. | Frames and Framesets | JSplitPane |
| Grids | Provide a grid in which to lay out components. Grids can have fixed or automatically adjusting column and row sizes. Cells within a grid can span multiple columns or rows. | Tables | GridBagLayout |
| Insets | Provide panels, panes, and grid cells with margins. | CSS Margins | Insets |
Using Panes
Echo windows are divided into sections using components called Panes. An Echo Window may have only one child component as its content, and that child must be dervided from the AbstractPane class, which forms the basic specification for a pane component. Up until this chapter, all applications have used a single ContentPane covering the entirity of a Window to satisfy this requirement.
ContentPane
A ContentPane is a pane component which may contain regular components, e.g., Buttons, Labels, Grids, TextFields, and layout struts.
ContainerPane
ContainerPanes are used to break a window up into multiple regions. A ContainerPane may contain ContentPanes and other ContainerPanes within itself. All components that reside directly within a ContainerPane must be pane components themselves, i.e., they must be derivatives of the AbstractPane class. The orientation property of a ContainerPane determines whether the contents will be laid out horizontally (left-to-right), or vertically (top-to-bottom).
The Grid Component
The Grid component provides the capability to lay out components within a grid. Each cell of a grid may contain zero or more components. Dimensions of grid columns and rows may be specified using pixel or percent-based width units, or may be left to be sized automatically according to their content.
Grids feature the ability to display cells that span multiple rows and columns. This ability may be exercised by the developer in one of two ways: First, s/he may configure a cell such that it will occupy a specific number of columns or rows by invoking the setRowSpan() and/or setColumnSpan() methods. Second, the developer may configure a cell to "flow" into neighboring unoccupied cells using the setFlow() and setFlowPriority() methods. This method is typically used in cases where calculating the number of spanned-over cells would be overly difficult.
The Layout Example Application
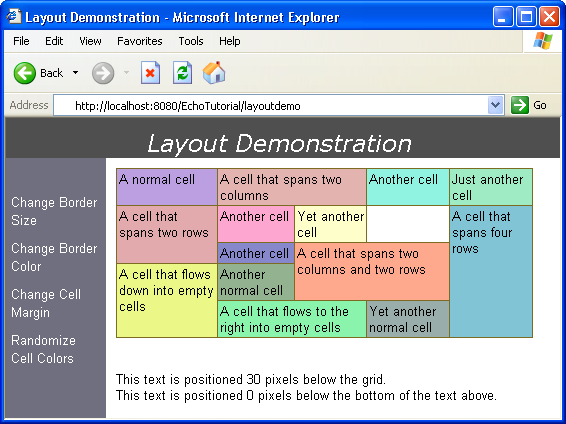
The example program for this section demonstrates all of the above layout capabilities. The example program's window is divided into three separate areas using panes. Each pane is given a different background color.
The top pane contains a panel whose content is centered.
The left pane contains a grid that contains some buttons. This pane has had its Insets adjusted, such that all margins are zero except for the top, which has been set to 30 pixels. Note that the buttons do not align with the left and right sides of the pane because the grid has a cell margin set.
The center pane contains another grid that demonstrates some of the Grid component's more advanced capabilities. The center pane's grid has cells that take up multiple rows and columns. It has borders, cell background colors, and an empty cell. Below the center pane's grid are two lines of text. Between the grid and the first line of text is a 30-pixel high strut. Between the two lines of text is a zero-pixel high strut.
If you have the Echo Tutorial Examples installed, you may run this example by visiting http://localhost:8080/EchoTutorial/layoutdemo. You must change the hostname and port number if your server is not running on localhost on port 8080.
import java.util.Iterator;

import nextapp.echo.Button;
import nextapp.echo.Color;
import nextapp.echo.ContainerPane;
import nextapp.echo.ContentPane;
import nextapp.echo.EchoInstance;
import nextapp.echo.EchoConstants;
import nextapp.echo.Filler;
import nextapp.echo.Font;
import nextapp.echo.Grid;
import nextapp.echo.Insets;
import nextapp.echo.Label;
import nextapp.echo.Panel;
import nextapp.echo.Window;

import nextapp.echo.event.ActionListener;
import nextapp.echo.event.ActionEvent;

import nextapp.echoservlet.EchoServer;

public class LayoutServlet extends EchoServer {

    public EchoInstance newInstance() {
        return new LayoutDemo();
    }
}

class LayoutDemo extends EchoInstance
implements ActionListener {

    // Constants for fonts and colors.
    public static final Color TITLE_PANE_GRAY
            = new Color(0x4f, 0x4f, 0x4f);
    public static final Color BUTTON_PANE_BLUE
            = new Color(0x6f, 0x6f, 0x7f);
    public static final Font TITLE_FONT
            = new Font(Font.VERDANA, Font.ITALIC, 18);

    // Constants for action commands.
    private static final String ACTION_CHANGE_BORDER_COLOR
            = "changeBorderColor";
    private static final String ACTION_CHANGE_CELL_MARGIN
            = "changeCellMargin";
    private static final String ACTION_RANDOMIZE_CELL_COLORS
            = "randomizeCellColors";
    private static final String ACTION_CHANGE_BORDER_SIZE
            = "changeBorderSize";

    // The demoGrid is protected because this class will be
    // extended in a later example and the extending class
    // will need access to it.
    protected Grid demoGrid;

    // In this example, Action Commands are used to
    // determine which button was pressed when events
    // occur.  Each button has its actionCommand property
    // set to a unique string.
    public void actionPerformed(ActionEvent e) {
        if (ACTION_CHANGE_BORDER_COLOR.equals(
                e.getActionCommand())) {
            changeBorderColor();
        } else if (ACTION_CHANGE_CELL_MARGIN.equals(
                e.getActionCommand())) {
            changeCellMargin();
        } else if (ACTION_CHANGE_BORDER_SIZE.equals(
                e.getActionCommand())) {
            changeBorderSize();
        } else if (ACTION_RANDOMIZE_CELL_COLORS.equals(
                e.getActionCommand())) {
            randomizeCellColors();
        }
    }

    // Changes the border color of the demoGrid to a random
    // dark color.
    public void changeBorderColor() {
        demoGrid.setBorderColor(randomColor(false));
    }

    // Changes the border size of the demoGrid between
    // 0, 1, 2, 4, and 8 pixels.
    public void changeBorderSize() {
        if (demoGrid.getBorderSize() == 0) {
            demoGrid.setBorderSize(1);
        } else if (demoGrid.getBorderSize() < 8) {
            demoGrid.setBorderSize(
                    demoGrid.getBorderSize() * 2);
        } else {
            demoGrid.setBorderSize(0);
        }
    }

    // Changes the grid cell margin of the demoGrid between
    // 0, 2, 6, 14, and 30 pixels.
    public void changeCellMargin() {
        if (demoGrid.getCellMargin() < 15) {
            demoGrid.setCellMargin(
                    demoGrid.getCellMargin() * 2 + 2);
        } else {
            demoGrid.setCellMargin(0);
        }
    }

    // This method creates the demonstration grid that is
    // found in the main pane.
    public Grid createDemoGrid() {

        Grid grid = new Grid();
        Grid.Cell cell;

        // The cell margin is the whitespace that will
        // surround the contents of every cell.
        grid.setCellMargin(4);

        // The grid's border color is set to a random value.
        grid.setBorderColor(randomColor(false));

        grid.setBorderSize(1);

        // Create a new cell.
        cell = new Grid.Cell();

        // Add a label to the cell.
        cell.add(new Label("A normal cell"));

        // Add the cell to the grid at
        // column 0, row 0.
        grid.add(0, 0, cell);

        // Create a new cell.
        cell = new Grid.Cell();

        // Add a label to the cell.
        cell.add(new Label("A cell that spans two columns"));

        // The cell will span two columns.
        cell.setColumnSpan(2);

        // Add the cell to the grid at
        // column 1, row 0.
        grid.add(1, 0, cell);

        // And so on....
        cell = new Grid.Cell();
        cell.add(new Label("Another cell"));
        grid.add(3, 0, cell);

        cell = new Grid.Cell();
        cell.add(new Label("Just another cell"));
        grid.add(4, 0, cell);

        cell = new Grid.Cell();
        cell.add(new Label("A cell that spans two rows"));
        cell.setRowSpan(2);
        grid.add(0, 1, cell);

        cell = new Grid.Cell();
        cell.add(new Label("Another cell"));
        grid.add(1, 1, cell);

        cell = new Grid.Cell();
        cell.add(new Label("Yet another cell"));
        grid.add(2, 1, cell);

        // There is no cell at (3,1).
        // At this location, there will be an empty hole.

        cell = new Grid.Cell();
        cell.add(new Label("A cell that spans four rows"));
        cell.setRowSpan(4);
        grid.add(4, 1, cell);

        cell = new Grid.Cell();
        cell.add(new Label("Another cell"));
        grid.add(1, 2, cell);

        cell = new Grid.Cell();
        cell.setColumnSpan(2);
        cell.setRowSpan(2);
        cell.add(new Label("A cell that spans two columns "
                + " and two rows"));
        grid.add(2, 2, cell);

        cell = new Grid.Cell();
        cell.add(new Label(
                "A cell that flows down into empty cells"));

        // Setting the flow of a cell will cause it to
        // attempt to fill any empty spaces in the specified
        // direction(s).
        cell.setFlow(Grid.Cell.FLOW_DOWN);

        grid.add(0, 3, cell);

        cell = new Grid.Cell();
        cell.add(new Label("Another normal cell"));
        grid.add(1, 3, cell);

        cell = new Grid.Cell();
        cell.add(new Label("A cell that flows to the "
                 + "right into empty cells"));
        cell.setFlow(Grid.Cell.FLOW_RIGHT);
        grid.add(1, 4, cell);

        cell = new Grid.Cell();
        cell.add(new Label("Yet another normal cell"));
        grid.add(3, 4, cell);

        return grid;
    }

    // The EchoInstance's initialization method.
    // This method will setup the contents of the window.
    public Window init() {

        // Create a panel that will house the title text.
        Panel titlePanel = new Panel();

        // Set the alignment of the title panel to center
        // the title.
        titlePanel.setHorizontalAlignment(
                EchoConstants.CENTER);

        // Add the title text to the title pane.
        titlePanel.add(new Label("Layout Demonstration"));

        // Create the title title pane.
        ContentPane titlePane = new ContentPane();

        // The titlePane will be 40 pixels high.
        titlePane.setHeight(40);

        // The setScrollBarPolicy() method allows you to
        // control whether the pane will have scroll bars.
        // In this case, we do not ever want the title
        // pane to have scroll bars, even if they would be
        // required to see all its content.
        titlePane.setScrollBarPolicy(
                ContentPane.SCROLL_BAR_NEVER);

        titlePane.setForeground(Color.WHITE);
        titlePane.setBackground(TITLE_PANE_GRAY);
        titlePane.setFont(TITLE_FONT);

        // Add the title panel to the title pane.
        titlePane.add(titlePanel);

        // Create a new, empty grid to hold the buttons.
        Grid buttonGrid = new Grid();

        // Set the cell margin to 5.
        buttonGrid.setCellMargin(5);

        Button button;
        button = new Button("Change Border Size");

        // In this example, Action Commands are used to
        // determine which button was pressed when events
        // occur.  Each button has its actionCommand property
        // set to a unique string.  When an ActionEvent
        // occurs, the actionPerformed() method will call
        // the ActionEvent's getActionCommand() method to
        // determine which button was pressed.
        button.setActionCommand(ACTION_CHANGE_BORDER_SIZE);

        button.addActionListener(this);

        // Add the button to the grid at column 0 and row 0.
        buttonGrid.add(0, 0, button);

        button = new Button("Change Border Color");
        button.setActionCommand(ACTION_CHANGE_BORDER_COLOR);
        button.addActionListener(this);
        buttonGrid.add(0, 1, button);
        button = new Button("Change Cell Margin");
        button.setActionCommand(ACTION_CHANGE_CELL_MARGIN);
        button.addActionListener(this);
        buttonGrid.add(0, 2, button);
        button = new Button("Randomize Cell Colors");
        button.setActionCommand(ACTION_RANDOMIZE_CELL_COLORS);
        button.addActionListener(this);
        buttonGrid.add(0, 3, button);

        ContentPane buttonPane = new ContentPane();
        // The buttonPane will be exactly 100 pixels wide.
        buttonPane.setWidth(100);

        // The buttonPane will have no scroll bars.
        buttonPane.setScrollBarPolicy(
                ContentPane.SCROLL_BAR_NEVER);

        // Set the insets (margins) for the button pane.
        // In this case we want all margins except the top
        // margin to be zero.  The top margin will be set
        // to thirty pixels in height.
        buttonPane.setInsets(new Insets(0, 30, 0, 0));

        buttonPane.setForeground(Color.WHITE);
        buttonPane.setBackground(BUTTON_PANE_BLUE);
        buttonPane.add(buttonGrid);

        // Create the main pane.
        ContentPane mainPane = new ContentPane();

        // Create the "demo grid" and add it to the
        // main pane.
        demoGrid = createDemoGrid();
        mainPane.add(demoGrid);

        // Add thirty pixels high strut to seperate the demo
        // grid from the text that will go underneath it.
        mainPane.add(Filler.createVerticalStrut(30));

        // Add the upper text.
        mainPane.add(new Label("This text is positioned "
                + "30 pixels below the grid."));

        // Add a zero pixel high strut to seperate the two
        // lines of text.  A zero pixel high strut is
        // effectively like adding a newline character.
        mainPane.add(Filler.createVerticalStrut(0));

        // Add the lower text.
        mainPane.add(
                new Label("This text is positioned 0 pixels "
                + "below the bottom of the text above."));


        // Craete the inner container pane.  This
        // containerPane will hold the button pane and
        // the main pane.
        ContainerPane horizontalContainer
                = new ContainerPane();

        // Set this container pane to lay out its child
        // panes horizontally.
        horizontalContainer.setOrientation(
                ContainerPane.ORIENTATION_HORIZONTAL);

        // Add the button and main panes to the
        // horizontal container pane.
        horizontalContainer.add(buttonPane);
        horizontalContainer.add(mainPane);


        // Create the outside container pane.  This
        // containerPane will have the title pane on the
        // top and another pane below it.
        ContainerPane verticalContainer
                = new ContainerPane();

        // Set this container pane to lay out its child
        // panes vertically.
        verticalContainer.setOrientation(
                ContainerPane.ORIENTATION_VERTICAL);

        // Add the title pane and then the horizontal
        // container pane to the vertical container
        // pane.
        verticalContainer.add(titlePane);
        verticalContainer.add(horizontalContainer);

        // Create the window
        Window window = new Window("Layout Demonstration");

        // Set the content of the window to be the vertical
        // (outer) container pane.
        window.setContent(verticalContainer);

        return window;
    }

    // The randomColor method returns a random Color object.
    // The boolean parameter "light" is used to
    // determine whether the color will be very light
    // or very dark.  (In the example, dark borders
    // and light cell backgrounds are used.
    public Color randomColor(boolean light) {
        int red = ((int) Math.floor(Math.random() * 128))
                + (light ? 128 : 0);
        int green = ((int) Math.floor(Math.random() * 128))
                + (light ? 128 : 0);
        int blue = ((int) Math.floor(Math.random() * 128))
                + (light ? 128 : 0);
        return new Color(red, green, blue);
    }

    // The randomizeCellColors() method is called whenever
    // the user clicks the corresponding button in the left
    // pane.  This method will cause the background colors
    // of all cells in the grid to be set to new values.
    public void randomizeCellColors() {
        // The iterator() method will return an iterator
        // over all the cells in the grid.
        Iterator it = demoGrid.iterator();
        while (it.hasNext()) {
            ((Grid.Cell) it.next()).setBackground(
                    randomColor(true));
        }
    }

}